You can create semi transparent windows with the extended styles WS_EX_TRANSPARENT and WS_EX_LAYERED.
First you define how transparent your window has to be by calling SetLayeredWindowAttributes. Then you set the WS_EX_LAYERED attribute to make it transparent.
If you also sets the WS_EX_TRANSPARENT style, you will be able to operate the window below yours through yours, this is especialy usefull if you want to have a window open allways on top of all other, to monitor e.g. the clock.
First a button handler:
   case WM_COMMAND:
      if(HIWORD(wParam) == BN_CLICKED &&
         LOWORD(wParam) == IDC_BUTTON1)
      {
         if(IsTransparent)
         {
            IsTransparent = false;
            SetDlgItemText(hwndDlg, IDC_STATIC_1, "Off");
            SetWindowPos(hwndDlg, HWND_NOTOPMOST, 0, 0, 0, 0,
                         SWP_NOMOVE|SWP_NOSIZE);
         }
         else
         {
            IsTransparent = true;
            SetDlgItemText(hwndDlg, IDC_STATIC_1, "On");
            SetWindowPos(hwndDlg, HWND_TOPMOST, 0, 0, 0, 0,
                         SWP_NOMOVE|SWP_NOSIZE);
         }
      }
      break;
IsTransparent is a global bool, somewhere at the to of the file:
bool IsTransparentIf the dialog was not transparent we will set the text on the label to "On", to indicte that it is now to be transparent, and we use the SetWindowPos function to put our dialog on top of other windows, and let it stay there.
If the dialog box were transparet we set the label text to "Off", and makes our dialogbox behave as normal windows.
This does not make the dialog box transparent, we will make it transparent when it is deactivated; that is, when the user select another window. If we made the dialog box transparent when the button was pushed, the user would not be able to push the button again, as the window was transparent, so he would just hit what was below it.
We use the WM_ACTIVATEAPP event, the wParam tells if the window is activated (true) or deactivated (false):
   case WM_ACTIVATEAPP:
   {
      const LONG Style = WS_EX_LAYERED | WS_EX_TRANSPARENT;
      if(wParam)
      {  // We are activating, so remove the styles
         LONG OldState = GetWindowLong(hwndDlg, GWL_EXSTYLE);
         LONG NewState = OldState & ~Style;
         SetWindowLong(hwndDlg, GWL_EXSTYLE, NewState);
      }
      else
      {  // We are deactivating, so use the style, if set
         if(IsTransparent)
         {
            LONG OldState = GetWindowLong(hwndDlg, GWL_EXSTYLE);
            LONG NewState = OldState | Style;
            SetWindowLong(hwndDlg, GWL_EXSTYLE, NewState);
            SetLayeredWindowAttributes(hwndDlg,0,160,LWA_ALPHA);
         }
      }
      break;
   }
When you now hit the button so the label shows On, and deactivates the dialog box it should be transparent.To activate it again you have to select it on the process bar or use Alt+Tab to select it.
The complete code for the application can be found here

And now we will create a fading popup message window, not unlike the one seen when you receives a mail or a message is received from MSN.
First we must create the window:
   HBRUSH BackBrush = CreateSolidBrush(RGB(0xA0, 0xA0, 0xFF));
   WNDCLASS wc;
   memset(&wc, 0, sizeof(WNDCLASS));
   wc.style = CS_HREDRAW | CS_VREDRAW | CS_DBLCLKS;
   wc.lpfnWndProc = DialogProc;
   wc.hInstance = InstanceHandle;
   wc.hbrBackground = BackBrush;
   wc.lpszClassName = "WhateverClass";
   wc.hCursor = LoadCursor(NULL, IDC_ARROW);
   if(!RegisterClass(&wc))
      return FALSE;
   int Width = GetSystemMetrics(SM_CXFULLSCREEN);
   int Height = GetSystemMetrics(SM_CYFULLSCREEN);

   HWND WindowHandle = CreateWindow("WhateverClass",
                                    "",
                                    WS_VISIBLE | WS_CLIPSIBLINGS |
                                    WS_CLIPCHILDREN,
                                    Width - WINDOW_WIDTH,
                                    Height - WINDOW_HEIGHT,
                                    WINDOW_WIDTH,
                                    WINDOW_HEIGHT,
                                    NULL,
                                    NULL,
                                    InstanceHandle,
                                    0);
BackBrush will be used to draw the background for the application, here some light blue color.The window has no caption bar and no border, its a flat window.
The window is placed at the lower left corner of the screen.
Next we will handle WM_CREATE, and create two static texts, only the first is shown here:
   case WM_CREATE:
   {
      CreateWindow("STATIC",
                   "Some multi line\r\nText",
                   WS_CHILD | WS_VISIBLE | SS_CENTER,
                   5, 5, WINDOW_WIDTH - 10, 45,
                   hwndDlg,
                   (HMENU)(IDC_STATIC_1),
                   InstanceHandle,
                   0);
Then, still within WM_CREATE we will do:
      SetWindowPos(hwndDlg, HWND_TOPMOST, 0, 0, 0, 0,
                   SWP_NOMOVE | SWP_NOSIZE | SWP_ASYNCWINDOWPOS);
      LONG OldState;
      LONG NewState;
      OldState = GetWindowLong(hwndDlg, GWL_STYLE);
      NewState = OldState & ~WS_CAPTION;
      SetWindowLong(hwndDlg, GWL_STYLE,  NewState);
      OldState = GetWindowLong(hwndDlg, GWL_EXSTYLE);
      NewState = OldState | WS_EX_LAYERED |
                 WS_EX_TRANSPARENT | WS_EX_TOOLWINDOW;
      SetWindowLong(hwndDlg, GWL_EXSTYLE, NewState);
      SetLayeredWindowAttributes(hwndDlg, 0, 0, LWA_ALPHA);
      TextBrush = CreateSolidBrush(RGB(255, 255, 255));
      SetTimer(hwndDlg, IDC_TIMER_1, 100, 0);
First the window is placed above all other windows.Then we removes the caption bar, we did not ask for one, but we get it anyway, so we have to remove it.
Then we make the window transparent, and sets the opacity of the window to 0, thats completly transparent, i.e. the window is not visible.
We set the WS_EX_TOOLWINDOW style, as we do not want the application to be visible on the taskbar.
Then we create a brush which is to be used as background for the text, the brush is white.
And finnaly we start a timer.
When the timer elaps we will change the opacity of the window, and at the end exit:
   case WM_TIMER:
   {
      Trans += 4;
      if(Trans >= 0x200)
         PostQuitMessage(0);
      else if(Trans < 0x100)
         SetLayeredWindowAttributes(hwndDlg,
                                    0,
                                    Trans,
                                    LWA_ALPHA);
      else
         SetLayeredWindowAttributes(hwndDlg,
                                    0,
                                    255 - (Trans - 0x100),
                                    LWA_ALPHA);
      break;
   }
To display the text with the right look we will handle WM_CTLCOLORSTATIC to set the colors used when
drawing the text:
   case WM_CTLCOLORSTATIC:
   {
      HDC dc = (HDC )wParam;
      SetBkMode(dc, TRANSPARENT);
      int Id = GetDlgCtrlID((HWND )lParam);
      if(Id == IDC_STATIC_1)
         SetTextColor(dc, RGB(0, 0, 0));
      else
         SetTextColor(dc, RGB(255, 0, 0));
      return (LRESULT )TextBrush;
   }
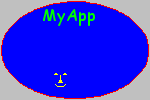
And thats it. The complete code can be seen here.Now we will create a window which looks like this:
Now what is that? It is a ellipse formed window with a button on it. The technique used here can be used to create windows with any form.
First we create a bitmap image with the background image of our window:
When the window is created we tell the system to treat the gray color as a transparent color, it will thus not paint that part of the window. First the window is created the normal way, see the source for details.
In the messagehandler the button is created, again this is done as allways.
Then we load the bitmap used as backgroud:
      BackBitMap = (HBITMAP )LoadImage(0,
                                       "round.bmp",
                                       IMAGE_BITMAP,
                                       150,
                                       100,
                                       LR_LOADFROMFILE);
Then we tell Windows that our window is to be "Layered":
      SetWindowLong(hwndDlg,
                    GWL_EXSTYLE,
                    GetWindowLong(hwndDlg, GWL_EXSTYLE) |
                    WS_EX_LAYERED);
Next we tell that the gray color from the bitmap is to be transparent:
      SetLayeredWindowAttributes(hwndDlg,
                                 RGB(0xC0, 0xC0, 0xC0),
                                 0,
                                 LWA_COLORKEY);
Now we draw the window, we create a function to do it:
void DrawWindow(HWND hwnd)
{
   HDC DC = GetWindowDC(hwnd);
   HDC MemDC = CreateCompatibleDC(DC);
   SelectObject(MemDC, BackBitMap);
   BitBlt(DC, 0, 0, 150, 100, MemDC, 0, 0, SRCCOPY);
   DeleteDC(MemDC);
   ReleaseDC(hwnd, DC);
   EnumChildWindows(hwnd, EnumChildProc, 0);
}
The last step is to draw all child windows, EnumChildProc is a function which will be called for all child
windows:
BOOL CALLBACK EnumChildProc(HWND hwnd, LPARAM lParam)
{
   InvalidateRect(hwnd, 0, TRUE);
   return TRUE;
}
Now we must handle any messages which will draw the application, and use our DrawWindow function
to draw it:
   case WM_PAINT:
   {
      PAINTSTRUCT PaintStruct;
      BeginPaint(hwndDlg, &PaintStruct);
      EndPaint(hwndDlg, &PaintStruct);
   }
   case WM_ACTIVATE:
   case WM_NCACTIVATE:
   case WM_NCPAINT:
   {
      DrawWindow(hwndDlg);
      return 0;
   }
WM_PAINT is needed as our bitmap is used for both the non-client and client area.If we don't handle WM_ACTIVATE and WM_NCACTIVATE windows will draw a caption bar on the application, and we don't want it to.
And that's all, the source.